Contenido | Siguiente: Inicio rápido →
DimmerLink — Documentación del usuario
Controlador de dimmer AC para el control de brillo de lámparas mediante TRIAC. Se conecta a su proyecto (Arduino, ESP32, Raspberry Pi, etc.) y permite controlar dimmers AC con comandos simples.
Trabajar con DimmerLink es fácil.
Características principales
✅ SIN PARPADEO — Un Cortex-M+ dedicado gestiona todos los tiempos críticos. Sin retardos de software, conflictos de interrupción ni parpadeo.
✅ NO REQUIERE BIBLIOTECAS — Envíe comandos simples de 3–4 bytes por UART o I2C. Funciona con cualquier lenguaje de programación. Literalmente 5 líneas de código.
✅ COMPATIBILIDAD UNIVERSAL — Arduino, ESP32, ESP8266, Raspberry Pi, STM32, cualquier MCU con UART/I2C. Soporta niveles lógicos de 1.8V, 3.3V y 5V.
✅ CONTROL DE BRILLO — Rango 0–100%
✅ CURVAS DE ATENUACIÓN — Lineal, RMS (para incandescentes), Logarítmica. Detección automática de la frecuencia de red 50/60 Hz.
✅ DETECCIÓN DE RED — Detección automática de la frecuencia de red (50/60 Hz)
✅ INTERFAZ DUAL — UART (115200 8N1) o I2C. Cambio por comando en cualquier momento.
✅ ULTRA-COMPACT — Only 18×12mm. Standard 0.1" pins. Fits in any enclosure.
✅ PLUG & PLAY — Conecte, encienda, envíe un comando. Dimmer funcionando en 5 minutos.
El problema que resolvemos
Todo maker conoce este problema: añades una biblioteca de dimmer AC a tu proyecto y, de repente, las lámparas empiezan a parpadear, los tiempos se desajustan y pasas horas depurando conflictos de interrupción. DimmerLink elimina completamente este problema al trasladar todas las operaciones críticas en tiempo a un microcontrolador Cortex-M+ dedicado.
Cómo funciona
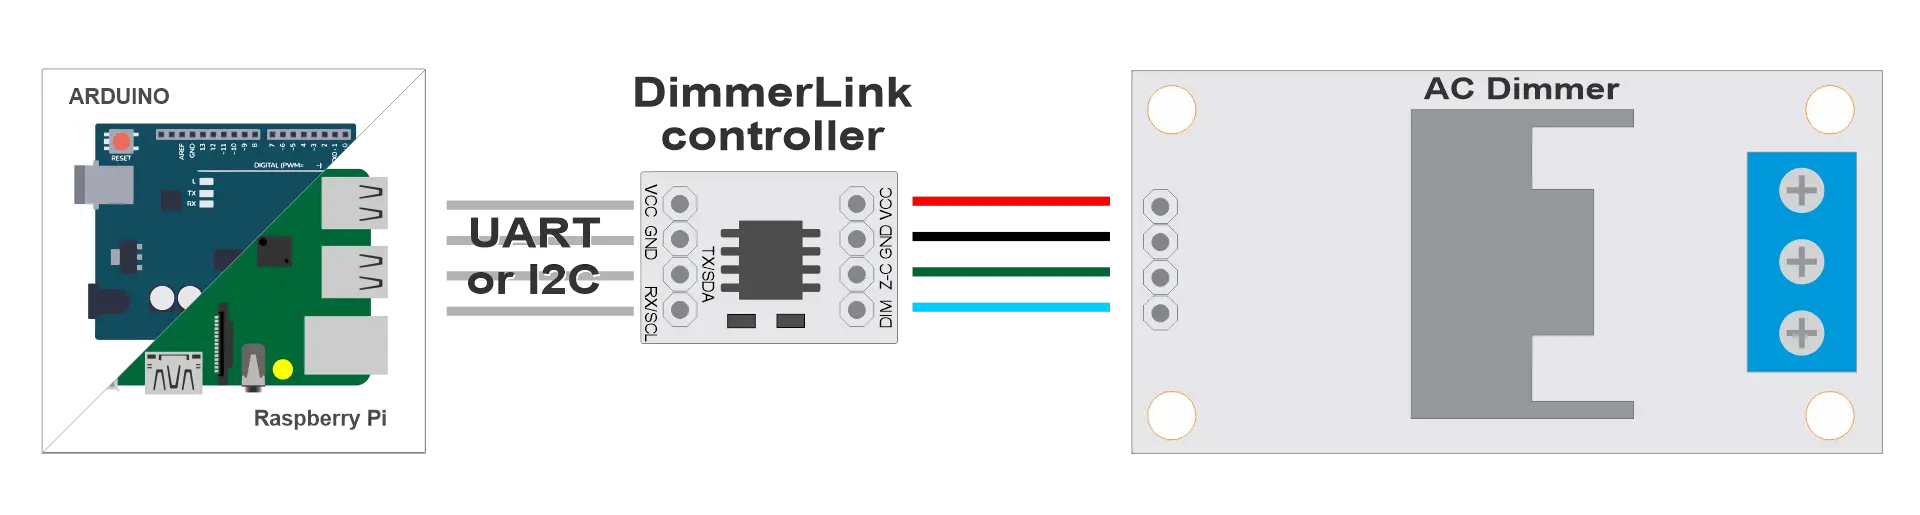
Conecte DimmerLink entre su controlador (Arduino, ESP32, Raspberry Pi o cualquier MCU) y un módulo de dimmer AC. Envíe un comando de 3 bytes como SET 50% por UART o escriba un valor en un registro I2C. El controlador se encarga de la detección de cruce por cero, calcula el ángulo de fase y controla el TRIAC con precisión de microsegundos. Sin bibliotecas. Sin interrupciones. Sin conflictos con su código.
También puede conectar módulos de transmisión remota como LoRa, GSM/GPRS, Bluetooth o puentes WiFi, o simplemente conectarse a su PC mediante módulos USB-UART como CH340, CP2102/CP2104. Módulos industriales RS-232. No se necesita código, solo comandos por terminal.
¿Qué interfaz elegir?
| Criterio | UART | I2C |
|---|---|---|
| Simplicidad de conexión | 2 cables + alimentación | 2 cables + alimentación |
| Velocidad | 115200 baudios | 100 kHz |
| Múltiples dispositivos | No | Sí (direcciones diferentes) |
| Funciona con puentes | Sí (USB-UART, WiFi, LoRa) | Limitado |
| Recomendación | Para control remoto | Para control local |
💡 Consejo: Recomendamos I2C para principiantes — código más simple, estructura más clara.
Compatibilidad
DimmerLink soporta niveles lógicos de 1.8V, 3.3V y 5V — ¡conexión directa sin convertidores de nivel!
| Plataforma | UART | I2C | Nivel lógico |
|---|---|---|---|
| Arduino Uno/Nano | ✓ | ✓ | 5V ✓ |
| Arduino Mega | ✓ | ✓ | 5V ✓ |
| ESP8266 | ✓ | ✓ | 3.3V ✓ |
| ESP32 | ✓ | ✓ | 3.3V ✓ |
| STM32 (Blue Pill) | ✓ | ✓ | 3.3V ✓ |
| Raspberry Pi Pico | ✓ | ✓ | 3.3V ✓ |
| Raspberry Pi 3/4/5 | ✓ | ✓ | 3.3V ✓ |
| Orange Pi | ✓ | ✓ | 3.3V ✓ |
| Banana Pi | ✓ | ✓ | 3.3V ✓ |
| ATtiny, nRF52, MSP430 | ✓ | ✓ | 1.8V ✓ |
Esta es solo una lista básica — ¡DimmerLink funciona con cualquier microcontrolador que tenga UART o I2C!
Ejemplo rápido
Arduino + I2C — establecer brillo al 50%:
#include

void setup() {
    Wire.begin();

    // Set brightness to 50%
    Wire.beginTransmission(0x50);
    Wire.write(0x10);  // Brightness register
    Wire.write(50);    // 50%
    Wire.endTransmission();
}

void loop() {}
Python + UART:
import serial

ser = serial.Serial('/dev/ttyUSB0', 115200)
ser.write(bytes([0x02, 0x53, 0x00, 50]))  # SET dimmer 0 to 50%
response = ser.read(1)
print("OK" if response[0] == 0 else "Error")
Ejemplo con terminal serie:
1. Port → select your COM port
2. Baud: 115200
3. Send → "Send Numbers" tab
4. Enter: 02 53 00 32 or 0x02 0x53 0x00 0x32 (HEX 32 is 50 in decimal)
5. Click "Send Numbers"
Ejemplos de código
Los ejemplos listos para usar se encuentran en la carpeta examples/ :
examples/
├── arduino/
│   ├── uart_basic.ino
│   └── i2c_basic.ino
├── python/
│   ├── uart_example.py
│   └── i2c_example.py
└── micropython/
    ├── uart_example.py
    └── i2c_example.py
Soporte
- GitHub Issues: Reportar un problema
- Página del producto: DimmerLink en rbdimmer.com
- Página en AliExpress: DimmerLink en AliExpress
Documentation Version: 1.0
Date: 2026-01